And that's all there is to it!!
Remember to draw your lines on both sides of the egg. When you are satisfied with the appearance of your lines, move ahead to white.
|
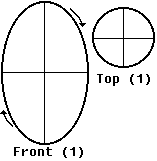
Front (1) shows the egg divided into eighths. You start by drawing one long line around the longest part of the egg, until it meets up with itself. Next, draw a long line at a right angle to this one, until it meets up with itself (see Top (1) for guidance on how this should look). Lastly, draw one line around the middle of the egg. Now the egg is divided into 8 equal sized parts. |
|
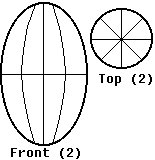
Front (2) shows the egg divided into sixteenths, using the same method as above (See Top (2) for guidance on how this should look). |
|
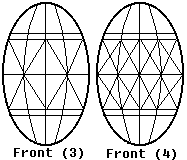
Front (3). First, you draw four lines parallel to the one drawn around the middle. Then, you draw diamonds in the boxes as shown in the diagram. Lastly, Front (4) shows that another interlinking set of diamonds are drawn on the egg. |
|
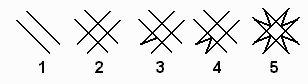
If you like, you can draw the stars in at this point. Check out the diagram to see how they're done, its not
as difficult as it might first seem.
(1) First, draw 2 parallel diagonal lines. (2) Then, draw an identical set, going the other way. Now start to draw in
the points of the star. (3) Draw a single line from the outer tip of one of the diagonal lines, to the midway point of the
inner box, as shown. (4) Do the same thing on the other side. (5) And finally, complete the star by following
steps 3-4 for the other three sides.
And that's all there is to it!! Remember to draw your lines on both sides of the egg. When you are satisfied with the appearance of your lines, move ahead to white. |